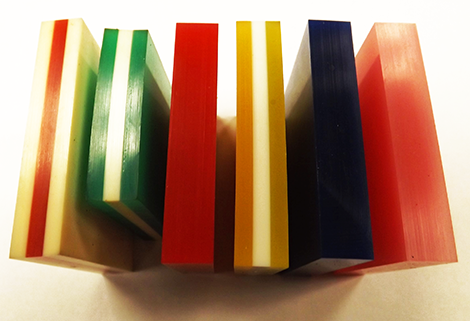
Single durometer squeegee blades (solid color) and multiple durometer composite blades (banded colors). Blades courtesy of Fimor.
This article by Kieth Stevens was published in Screen & Print Magazine.
Screen printers can show you many tools of their trade. However, most screen printers are not aware of how important the interrelationship between one tool and the other is. Prints can be improved on by simple adjustments. Knowing how one tool affects the other can improve productivity and profitability.
There are many variables and facets to consider when aiming for a print to go from average to great, or for production speeds to go from sluggish to fast. Take for example two of the most common, yet important ‘tools’ in a screen printer’s arsenal: squeegees and mesh. Both affect how ink is printed or ‘laid down’ onto the substrate.
SQUEEGEES
Squeegees are must-have basic tools for a screen printer. They come in many hardness levels (durometer). Typically, squeegees start at a soft 55 durometer and go up to a hard 80 durometer. To complicate matters, there are sandwich-type squeegee blades on the market that stack a soft and a hard blade or sandwich a hard blade between two soft blades. In addition, squeegees come in different shapes. Some blade edges are rounded, while others are square or even pointed.
With all the various choices available, it is easy for a screen printer to get confused about which type to use for what. Here is one basic rule to keep in mind: a soft squeegee lays down more ink than a hard squeegee.
Durometer/Hardness
50-60 durometer blades are considered ‘soft’ and will deposit more ink. Choose this durometer for heavily- textured fabrics such as fleece or sweatshirts, to lay down more ink (which may help with fibrillation) or when using special-effects inks, such as gels and puffs.
A 65-75 durometer designation ranks ‘medium’ on the hardness scale. This hardness range is a good choice or general printing.
The hardest option is a 80 durometer blade. It will deposit less ink and is great for printing fine detail or four-color process prints.
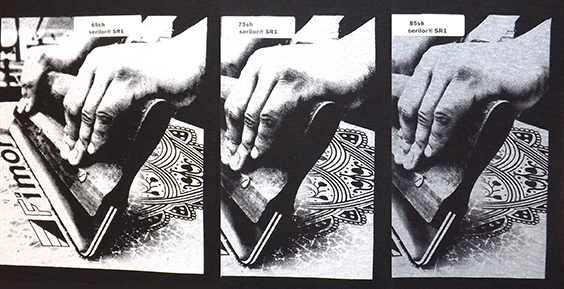
Actual print samples showing how variation in squeegee hardness affects ink deposit while all else is equal. Durometer hardness from left to right: 65, 75, 85. Print courtesy of Fimor.
Composite blades
Some squeegees are constructed as a ‘sandwich’, made out of different durometer blades. This type of squeegee blade consists of dual or triple blades of varying durometers sandwiched together, such as a 60/90 or a 70/90/70. The benefit of using this type of squeegee is that the harder durometer gives the squeegee great support while still having the softer edge for printing.
The disadvantage of the multi durometer, such as for instance 60/90, is that only the side with the soft edge is used for printing, which will make the squeegee curl around in one direction over time. Hence the invention of the triple blade, of which both sides of the blade can be used for printing to keep it balanced and straight.
Due to harsh cleaning chemicals and age, squeegees will become harder in durometer or even brittle in the long run. It is important to keep that in mind and not wait too long before getting a new blade. You will be surprised at the difference a new blade will make for such little expense.
Squeegee Profile
For textile screen printing, there are generally three different types of blade profiles: square, round and V-shaped.
Square (straight edge) blades are most commonly used by screen printers. They work well for standard or regular ink applications.
Round (bull nose) squeegee blades deposit more ink. Use this type for special effects inks such as gel or puff.
V-shaped (single- or double-level) blades are typically used for printing on irregular or cylindrically shaped substrates. Most textile screen printers typically use either the square or the round version.
Handles
A squeegee consists of two parts: the blade itself and the blade holder. It appears to be a simple design, but the blade holder comes in various shapes and materials and is designed to fulfill different functions.
For manual screen printing, for example, the holder actually becomes the handle of the squeegee. The printer should consider the feel of the handle when holding it, especially after having hold it for several hours of printing.
Wood, aluminum or plastic are the most popular materials used for handles and each material has its followers. Fans of the wooden handles appreciate the organic feel and warmth of wood, whereas fans of the newer plastic or aluminum handles prefer them for their easy-to-clean properties mind (since wood is absorbent it can absorb some of the cleaning chemicals).
Colors
Squeegee manufacturers like to color their blades, but don’t be deceived: the same red blade from one manufacturer does not necessarily have the same features as the red blade from another maker. I have often heard screen printers order ‘a red squeegee blade’ or ‘a yellow squeegee, please’, expecting the blade to be of the same durometer across various brands. In reality, brand ‘A’ might use red to mark their 60 durometer blade, whereas brand ‘B’ uses red for their 80 durometer blade. So ask for squeegees by naming durometer value rather than by naming color.
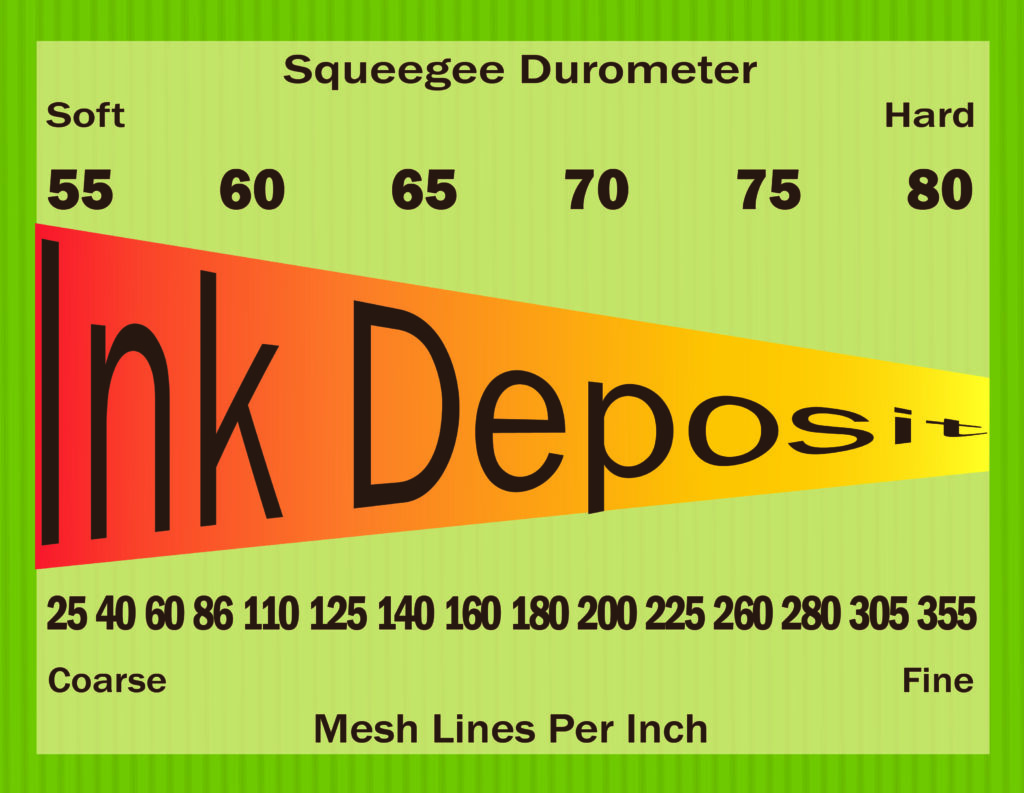
This handy chart shows the interrelationship between squeegee hardness (durometer), mesh lines (per inch) and ink deposit thickness. The softer the squeegee and the larger the mesh size, the smaller the ink deposit.
MESH
Just as squeegee hardness affects ink deposit, so does mesh count. Here’s another rule: the lower the mesh count, the larger the ink deposit. There are, however, other features that differentiate one mesh type over another.
Thread count
As most printers know, mesh controls the flow of ink once the squeegee passes over the image. The general rule of thumb is that the lower the mesh count is per inch (or cm), the larger the amount of ink flow.
However, In some cases it is possible to go higher in the amount of threads per inch/cm and get an even larger amount of flow. To explain this let’s discuss another aspect of mesh: thread diameter.
Thread diameter
Believe it or not, not all meshes of the same thread count function in the same way. It depends on the actual thread diameter used to create the mesh. Obviously, the thicker the thread diameter, the higher the tension you can achieve when stretching the screen. A thicker thread is also less likely to cause the screen mesh to pop or break.
Of course, we all agree that breaking mesh is bad. However, there are some options to consider. Some meshes are made with thinner thread diameters (still the same mesh count) and if used with care, don’t have to be stretched to such a high level as a you would with a thicker thread.
The advantage of using the thinner thread diameter for the same mesh count is that the thinner thread diameter allows a greater percentage of open area within the mesh, thus resulting in higher image definition and increased ink flow.
In other words, if the thread diameter is smaller, going to a higher mesh count is possible to still achieve a larger amount of ink flow and finer detail definition in the print.
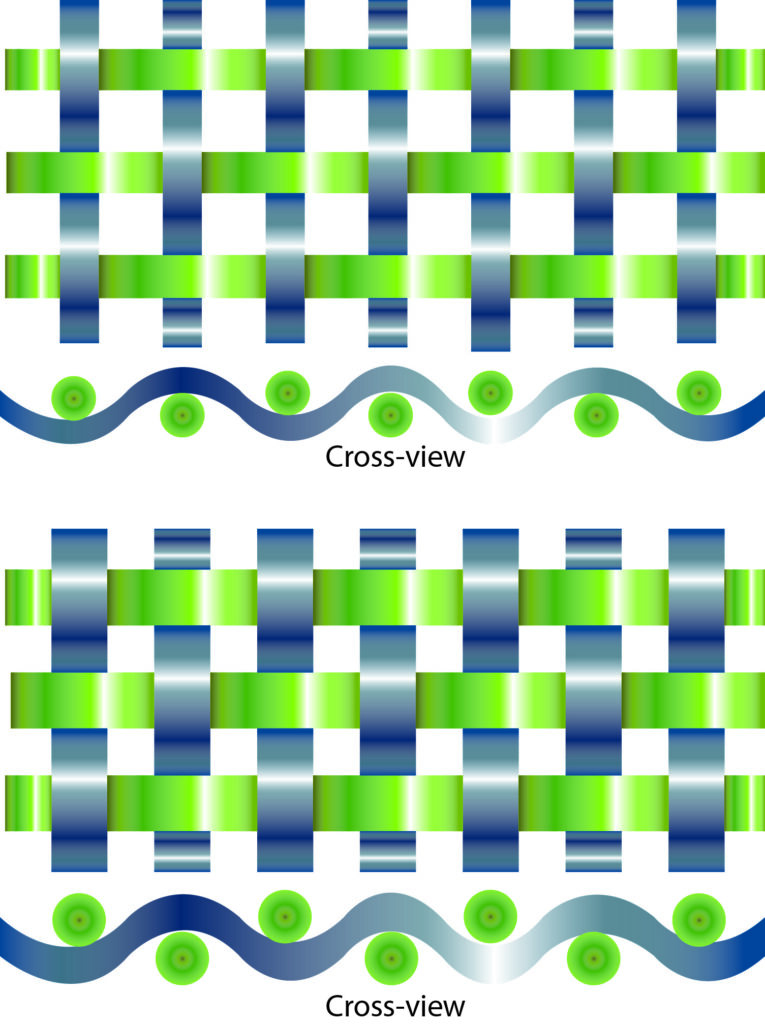
This image shows how thread thickness/diameter affects mesh opening, even for the same mesh count. The thinner the thread, the larger the opening and the more ink can flow through.
Here is a simple guide that will help choose the right mesh counts for the right job:
Mesh Count: 25, 40
Application: Coarse Glitter Inks
Mesh Count: 60, 86
Application: Specialty inks, such as puff or high-density, fine shimmers, glitters or metallic inks
Mesh Count: 110, 155
Application: Use when a large deposit of ink is needed, such as athletic numbers, printing white on black fabric, low-detail art or heavy white ink
Mesh Count: 160, 180, 200
Application: good for printing underbase white to create a softer overall feel, good medium-sized mesh count for medium-detailed artwork. The 200-count mesh can be an appropriate medium screen selection for when a 230 mesh is too fine and a 155 mesh is too coarse.
Mesh Count: 230, 280, 305
Application: low ink deposit, works well for halftone printing, simulated process or CMYK process printing and colors that print on top of a good, opaque white underbase.
Mesh Count: 355
Application: very low ink deposit, generally used by very experienced printers only. Often used for printing 65 line or higher halftones for very detailed images.
PUTTING IT ALL TOGETHER
Having said all this, it is hard to explain the total interrelationships that occur when the squeegees touch the ink and apply the ink to a shirt.
A soft squeegee pushing low viscosity ink (thin) through a coarse screen can apply too much ink. Use that soft squeegee to push a thick ink through a fine mesh and it will spell disaster.
Similarly, when a hard squeegee is used to push a thin ink using an open mesh or when the same hard squeegee is used to push thin ink with a lot of pressure through a fine mesh, less desirable printing outcomes may be the result in both these cases.
Knowing how one tool or the other can affect the outcome of a print can make a difference. You can apply this knowledge to adjust the variables to make a bad ink look better or a good ink look outstanding. Printing for me is a way of making art: a good printer knows how to use his tools to create the best possible print. A lot of experience is needed to master the finesses in screen printing, but knowing the basic facts about the interrelationship of tools that might affect various aspects of the print outcome is half the battle.