Solving Problematic Printing Issues (Part 1)
October 12, 2018
 Here is Part 1 of an article published by Impressions Magazine, in which Kieth Stevens gives us some tips on how to solve common issues many beginning screen printers may encounter:
Often I am asked to speak at an industry show or a Distributor’s Open House and I am honored to help. Prior to the event I usually go over my presentation and adjust the slides so that it applies to the particular market, whether it’s in Central America or in Los Angeles. Maybe it’s a market that is heavily into non-PVC or water base inks, or it could be a market that services local community businesses, such as local high school sports teams or restaurants. There are countless ways that I can adjust my presentation. The audience attending my presentations also differs; sometimes it consists largely of newcomers to the screen print industry, sometimes largely of seasoned printers.
So what are typical mistakes that beginner screen printers often make?
Not Asking for Help
One thing that I do not change in my presentation is my favorite creed: “If you need help or advice, contact your product vendor!” That is what they are there for. This advice is true whether you are new to screen printing or a seasoned veteran. Remember: If you don’t ask for help, then the problem or issue remains yours and yours to keep. Your vendor is the expert on their product line, so bring your issues to them. The help is free, it’s paid for by your purchases.
If it’s after hours, go to the product’s company website and look for some help there. Oftentimes, they have some how-to whitepapers or info on their blog. Or fill out the contact form – if available – and briefly explain your issue.
Relying Too Heavily on Internet Advice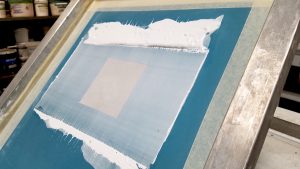 Another thing you should be aware of when going on the internet and searching for training or help videos, many of these types of seemingly informative videos can often mislead and confuse you more. The reason I first got into this business was the artistic part of screen printing. There are definitely a hundred different ways to coat or expose a screen, but which way is the best for your situation?
Yes, you can push a squeegee rather than pulling it across the screen, but should you? How much off-contact should you have? Or, what squeegee durometer should I use? There are so many to choose from. Unless you really have your act together, there generally is no perfect answer. Again, these are the types of questions that are hard to answer unless you have a more in-depth discussion about what your scenario is and maybe share some photos of your particular issue. Otherwise you would probably be given the wrong advice on how to solve your problem.
Every job or situation is unique and often, watching a video to get the right advice can confuse things even more. I’m not saying that there isn’t some good educational stuff out there, I’m just saying to use some common sense and not take everything as gospel? I’ve seen some videos put out by “print gurus” which made me cringe and also angry, because they are essentially propagating incorrect print techniques.
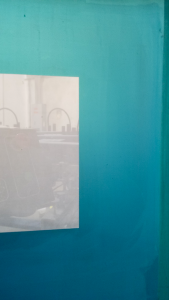
Film Lacking Opacity
Let’s take a moment to discuss film. One of the most important parts of the film is the opacity, i.e. how opaque the black part of the design is on the film and its ability to stop the light from passing through. When holding the film up to the sun for instance, how much light is visible through the dark areas? The less the better: Completely dark, nothing passing through is ideal and the closer to that, the better.
If you have film that is not as opaque as it should be, then you may lose some details of the design. So to compensate or try to fix the issue, you may have to cut back the exposure time. But here is where the trouble really starts. If you cut back the exposure time, there may be more pinholes or the emulsion may start to break down prematurely during a print job. The subtle halftones may also not look the way they should – all issues that can be avoided with opaque film.
I understand that in the real world there is some forgiveness with film opacity, but total blackout is the goal and that is how it used to be prior to the digital age. With opaque film, things just are easier, faster, better, more productive, more forgiving. Trust me, quality images start with the film and will degrade from there - so start off strong with quality opaque film. The amount the image degrades from the original all depends on the quality of the processes, well before the ink is applied to the substrate.
Another thing you should be aware of when going on the internet and searching for training or help videos, many of these types of seemingly informative videos can often mislead and confuse you more. The reason I first got into this business was the artistic part of screen printing. There are definitely a hundred different ways to coat or expose a screen, but which way is the best for your situation?
Yes, you can push a squeegee rather than pulling it across the screen, but should you? How much off-contact should you have? Or, what squeegee durometer should I use? There are so many to choose from. Unless you really have your act together, there generally is no perfect answer. Again, these are the types of questions that are hard to answer unless you have a more in-depth discussion about what your scenario is and maybe share some photos of your particular issue. Otherwise you would probably be given the wrong advice on how to solve your problem.
Every job or situation is unique and often, watching a video to get the right advice can confuse things even more. I’m not saying that there isn’t some good educational stuff out there, I’m just saying to use some common sense and not take everything as gospel? I’ve seen some videos put out by “print gurus” which made me cringe and also angry, because they are essentially propagating incorrect print techniques.
Film Lacking Opacity
Let’s take a moment to discuss film. One of the most important parts of the film is the opacity, i.e. how opaque the black part of the design is on the film and its ability to stop the light from passing through. When holding the film up to the sun for instance, how much light is visible through the dark areas? The less the better: Completely dark, nothing passing through is ideal and the closer to that, the better.
If you have film that is not as opaque as it should be, then you may lose some details of the design. So to compensate or try to fix the issue, you may have to cut back the exposure time. But here is where the trouble really starts. If you cut back the exposure time, there may be more pinholes or the emulsion may start to break down prematurely during a print job. The subtle halftones may also not look the way they should – all issues that can be avoided with opaque film.
I understand that in the real world there is some forgiveness with film opacity, but total blackout is the goal and that is how it used to be prior to the digital age. With opaque film, things just are easier, faster, better, more productive, more forgiving. Trust me, quality images start with the film and will degrade from there - so start off strong with quality opaque film. The amount the image degrades from the original all depends on the quality of the processes, well before the ink is applied to the substrate.
 Not Applying Enough Emulsion
Something that I often see less experienced printers do is not using enough emulsion on the shirt side of the screens and/or improperly drying them. There needs to be enough emulsion on the bottom of the screen so that it can properly hold back the ink from spreading out, like a dam. Emulsion’s job is to hold back the ink so that it can duplicate the design on the film as best as possible. Remember the film is a copy of the art, the screen a copy of the film, and then finally the print becomes another copy. The printed image will not improve from the original, but emulsion is a very important step to producing a print that is as close to the original as possible.
A good way to check if you have enough of an emulsion layer is to feel the edge of the emulsion where the design is. If you don’t feel a distinct edge, then there simply isn’t enough of a layer. Remember to always dry the coated screens horizontally with the ink side up. Try to avoid using fans to speed up the drying time as this only forces dirt and particulate to accumulate on the screen and may create pinholes, etc.
The upside of having enough emulsion is that it also will control the ink deposit amount and thus affect the ink’s opacity. If you want to try and eliminate the amount of print strokes required to achieve a more opaque print, try adding extra emulsion to the shirt side and you should see an improvement in ink opacity. This may also save printing time and increase the bottom line.
Read Part 2
Not Applying Enough Emulsion
Something that I often see less experienced printers do is not using enough emulsion on the shirt side of the screens and/or improperly drying them. There needs to be enough emulsion on the bottom of the screen so that it can properly hold back the ink from spreading out, like a dam. Emulsion’s job is to hold back the ink so that it can duplicate the design on the film as best as possible. Remember the film is a copy of the art, the screen a copy of the film, and then finally the print becomes another copy. The printed image will not improve from the original, but emulsion is a very important step to producing a print that is as close to the original as possible.
A good way to check if you have enough of an emulsion layer is to feel the edge of the emulsion where the design is. If you don’t feel a distinct edge, then there simply isn’t enough of a layer. Remember to always dry the coated screens horizontally with the ink side up. Try to avoid using fans to speed up the drying time as this only forces dirt and particulate to accumulate on the screen and may create pinholes, etc.
The upside of having enough emulsion is that it also will control the ink deposit amount and thus affect the ink’s opacity. If you want to try and eliminate the amount of print strokes required to achieve a more opaque print, try adding extra emulsion to the shirt side and you should see an improvement in ink opacity. This may also save printing time and increase the bottom line.
Read Part 2