Screen Print Precision - Part I
February 22, 2023
In part one of a two-part article published in Specialist Screen Printing Magazine, Kieth Stevens offers advice on the ideal materials - meshes, squeegees, emulsions and inks - to create cookie-cutter precision screen prints.
In the midst of setting up a screen printing job, it’s sometimes hard to remember all the processes that are at play. I am often asked a screen printing question that at first seems like a simple one which could be easily answered. How hard or complex is it really to slather ink onto a shirt? Create the art, make a screen, find the right colors and types of inks, grab a squeegee, then slather the ink through the screen just like spreading butter on your morning toast. All printers want the process to be cookie cutter perfect, but more often than not, it is quite the opposite.
"All printers want the process to be cookie cutter perfect, but more often than not, it is quite the opposite."
We sometimes forget all the variable factors happening around us that influence our screen print results. Many printers specialize in a particular type of substrate – only black or white cotton t-shirts or athletic numbered uniforms for example, others may specialize only in bags or other ad specialty/promotional items. When a shop prints the same type of substrate every day, they can hone in on the variables that affect their particular material and they become great at it. But the shops that can print successfully on all types of substrates, handle almost anything that is asked of them, those are the ones I’ve always had the upmost respect for.
“Why?” you ask. It’s because of all the variables they have to navigate. They have to think not only about the type of fabrics (is it 100 % cotton or an 80/20 or 50/50 blend or 100% polyester?) but also about other variables that can affect their print results. I’ve been to factories that print over 75,000 pieces per day and the operators are simply amazing on the quality and productivity that they achieve every day, all day. Their processes are like a well-oiled machine; they adjust to every factor going on. I rather liken screen printing to an art form. But let’s not forget, if you are running a print shop, you are in the business of making money.
So what is the secret to coming close to cookie cutter perfection every time? What are the factors that will affect your bottom line positively rather than negatively? Let me expose some of a successful shop’s true-and-tried processes.
A HEALTHY MESH
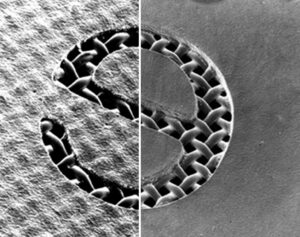
The importance of the mesh in screen printing is something that I am passionate about, as it has a direct and measurable effect on the overall health of your screen printing operation. The most common mesh comes from the filtration industry - things like water filtration and other types of filtration. The screen print industry uses these same products to make our screens. There are a few high-end mesh suppliers that make mesh specifically for our industry and they are fantastic products that I love to use and will discuss in a minute. The majority of mesh is not specifically made for our industry but a much larger industry encompassing water, silt, etc. As such, you can find cheaper type mesh. Most ready-for-use screens are often stretched using these mesh products and they work for 80 percent of our needs.
Screen printers who have done their homework will find - through trial and error - that there is a difference between the specialty mesh made specifically for screen printing and the usual variety. The screen-print specific mesh does come with a higher price, but they’ll find that there is a return on the investment. The return can be substantial for the everyday printer and the mesh can be a “must-have” when printing specialty inks like high density. You see, the meshes specifically designed for the screen print industry contain properties that can help maintain a higher tension over an extended run. This, in turn, helps maintain the proper off-contact and registration. And with a higher tension you can expect higher squeegee speed. Both are very sought-after, profitable attributes.
"The mesh in screen printing has a direct and measurable effect on the overall success of your screen-printing operation"
Upon further research, you may find that the mesh companies that make screen-print specific product offer meshes with not only various thread counts (threads per inch/CM) but also offer the same mesh counts in different thread diameters. Mesh created with a thinner thread diameter means that the percentage of mesh that the ink flows through is larger. This can help the squeegee run a little faster with less pressure. The ink remains on the surface of the substrate and is not pushed into the fabric (something which is not desirable). Be careful when handling these thinner meshes because just like fishing line, you can get more bites with the thinner thread but if you are not careful, you will break the line. But over the long haul, the thinner thread diameter will allow you to print more and earn more.
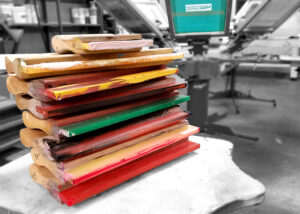
SQUEEGEE DUROMETERS
Squeegees are must-have basic tools for a screen printer. They come in many hardness levels (durometer). Typically, squeegees start at a soft 55 durometer and go up to a hard 80 durometer. To complicate matters, there are sandwich-type squeegee blades on the market that stack a soft and a hard blade or sandwich a hard blade between two softer blades. In addition, squeegees come in different shapes. Some blade edges are rounded, while others are square or even pointed.
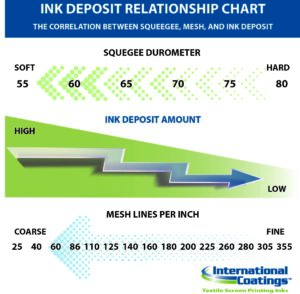
With all the various choices available, it is easy for a screen printer to get confused about which type to use for what. Here is one basic rule to keep in mind: a soft squeegee lays down more ink than a hard squeegee.
Durometer/Hardness
- 50-60 durometer blades are considered ‘soft’ and will deposit more ink. Choose this durometer for heavily- textured fabrics such as fleece or sweatshirts, to lay down more ink (which may help with fibrillation) or when using special-effects inks, such as gels and puffs.
- A 65-75 durometer designation ranks ‘medium’ on the hardness scale. This hardness range is a good choice or general printing.
- The hardest option is an 80 durometer blade. It will deposit less ink and is great for printing fine detail or four-color process prints. It’s also a good choice to use whenever the least amount of ink deposit is required.
"A basic rule to keep in mind is that a soft squeegee lays down more ink than a hard squeegee"
Composite Blades
The ‘sandwich’ type squeegee is made out of different durometer blades. This type of squeegee blade consists of dual or triple blades of varying durometers sandwiched together, such as a 60/90 or a 70/90/70. The benefit of using this type of squeegee is that the harder durometer gives the squeegee great support while still having the softer edge for printing. Some soft blades - when used on its own - bend over when pressure is added during the printing process. The triple blades help prevent that.
Squeegee Profile
For textile screen printing, there are generally three different types of blade profiles: Square, round and V-shaped.
- Square (straight edge) blades are most commonly used by textile screen printers. They work well for standard or regular ink applications.
- Round (bull nose) squeegee blades deposit more ink. Try this type for special effects inks such as gel or puff.
- V-shaped (single- or double-level) blades are typically used for printing on irregular or cylindrically shaped substrates. Most textile screen printers use either the square or the round version.
Remember, due to harsh cleaning chemicals and age, squeegees will become harder in durometer or even brittle in the long run. Its straight edge may become rounded, or chinks may form on the blade. Don’t wait too long before getting a new blade. Blades are relatively cheap, yet can affect your print quality and productivity positively. I always have fresh blades available, just in case. In general, a new squeegee will lay down less ink than a used one.
EMULSION THICKNESS
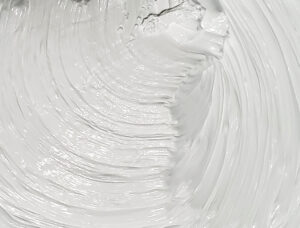
Whenever I enter a shop, I run my fingers over their screens. It tells me instantly whether their prints will be good or bad. How? The amount of emulsion covering their screens are a tell-tale sign of print quality. A screen that does not have enough emulsion coverage can result in ragged or uneven print edges. Having a properly thick and even emulsion stencil also helps eliminate mesh marks while increasing opacity. It’s important to have a thicker emulsion deposit on the bottom of the screen’s shirt side. I cannot stress enough how important the consistency of the emulsion thickness is to a “cookie-cutter” print process. The more consistent the application is, with the right amount of emulsion, the better the quality of the print. Pay attention on how you dry your coated screens. The coated screens should lay with the substrate (shirt) side down to allow the thicker deposit on the shirt side. Purchase a dehumidifier (not a heater) ASAP for your screen room to allow the screens to dry faster and harden consistently.
"The amount of emulsion covering the screens is a tell-tale sign of print quality"
Certain special effects inks may also require a much thicker emulsion coating than regular inks, such as for shimmer or glitter inks. Certain texturing inks such as puff, gels, or high density inks may also require thick coats.
INKS - CHOOSE WISELY
I could write a book just on ink and ink usage, but for the purpose of this article, I’ll summarize as follows: When it comes to ink, choose a quality brand through a distributor who will assist you in making the best choice for your needs.
- Get the right ink for the job. For example, get ink for cotton — such as a cotton white — if you’re printing on a cotton substrate. Cotton inks are may be lower in cost and can prevent ghosting on blends.
- Use a low-bleed ink if you’re printing on 50/50 poly/cotton fabric. Don’t use a low-bleed ink on dyed cotton fabrics, as ghosting may occur. Keep in mind that low-bleed inks are more expensive, so only use them on 50/50 and 100% polyester fabrics. Expect to pay a little more for the added benefits.
- Try a bleed blocker for fabrics that are prone to excessive dye migration. Use a gray or black bleed blocking ink as an under base. Bleed blockers provide superior dye blocking and can save your prints and your reputation.
- Use a low-cure ink for heat sensitive fabrics. Low-cure inks are great for fabrics that are heat sensitive, such as polypropylene bags or certain nylons. Again, these inks may costs more but can save money in energy costs and charge backs on returned jobs that bleed or garments that shrank.
- Use ink that can accommodate the stretch of stretchy fabric. Stretch additives are available if you want to make standard inks “stretchier.” Many athletic type garments contain added Lycra type fibers. You can expect a standard plastisol to stretch 100% (a 1 inch sized print can stretch to 2 inches for example). But athletic garments can stretch beyond that, so adding a stretch additive can assist with the stretchability of the print.
- Stir ink prior to use.The shearing effect will make the ink more printable and easier to use. It also will help ensure all the components are mixed well.
- Flood the screen with ink before actually printing.Flooding will ensure even distribution and pushes the ink into the screen. If the proper amount of flood pressure is used, then the ink will be in the correct position for the squeegee to apply the ink. If this is not done correctly, the squeegee must do the job of the flood and squeegee, which slows whole process and costs you money, time and quality.
- Cure at the recommended temperature settings. Plastisol ink is really not that complicated - the ink requires heat in order for its components to bond and form a strong “film.” When it does not get enough heat or time for those bonds to form, the film will tend to either crack when stretched, or wash off. In general, plastisol ink cures between 320-330ᶛF (160-165ᶛC), but low-cure inks can cure from 275-300ᶛF (135-149ᶛC). Be sure to test your dryer temperature using a donut probe and the surface of your garment using a temperature gun to ascertain that the temperatures are indeed correct. ALWAYS test your cure before starting a production run.
- Don’t fall for the hype. “If it sounds too good to be true, it probably is.” Buying inks online may save money, but only if the ink works well after you’ve tested them for compatibility, printability, durability and more. Do your homework and test them to be assured you’re getting what you paid for. Factor in the shipping costs and return shipping costs. Do they offer printing help or advise? A customer recently brought us a bucket of plastisol ink from a competitor and told us that it was supposed to cure as low as 180ᶛF (82ᶛC), which would be a game changer for the industry. But despite what the ad said, he was having problems getting the ink to cure even at higher temperatures and wanted us to test it as well. As expected, the inks did not cure until we passed it through the dryer at 300ᶛF (148ᶛC) for 1 minute.
"Watch for Part II..."
These four basic tools I’ve covered - mesh, emulsion, squeegees and inks – form the building blocks of a “cookie-cutter process.” There are other “tools of the trade” which are also relevant and I will cover those in Part II of this article. Printing for me is a way of creating art: A good printer knows how to use his tools to create the best possible print. A lot of experience is needed to master the finesse in screen printing, but knowing the basic facts about the interrelationship of tools that might affect various aspects of the print outcome is half the battle.