Manual Screen-Printing Success: Part 1
February 23, 2022
This article by Kieth Stevens was recently published in Impressions Magazine.
From the moment I enrolled in my high school printing class as a freshman to the time I printed my first shirt, I’ve been hooked on screen printing. In school, I remember the excitement and curiosity I felt as we started the screen-printign chapter of our textbook.
Similarly, when I did my first print in the 1970s — with some screens, air-dry flock adhesive inks, a squeegee and screen clamps I bought with my mom’s money — I was eager to learn and do more.
During the course of my career, I’ve learned to hone and fine-tune the manual screen-printing process, which I’ve always considered a mix of art and technique. Once you master the correct techniques and understand the correlation between the various tools, you can let your imagination take over and come up with cool ideas for print effects.
However, you can’t overlook the importance of those tools — the screen-printing press, screens, pallets and more. The following are some basic — but important — techniques you should use to set them up for manual screen printing. In the first of this two-part series, we will explore everything from press setup to pallets.
Press Setup
Setting up a manual screen-printing press is pretty straightforward, but there are a couple of things to keep in mind.
Step 1: First, the location of your manual press is important. Place it as close to the dryer as possible to avoid taking too many steps to lay printed shirts onto the dryer belt. Create a space — such as a table with casters — to place a stack of shirts close to the machine to avoid too many body movements while loading the shirts onto the pallet. This is not crucial if you are only doing a few shirts, but it’ll be a life-saver when printing hundreds or thousands of shirts. Each extra movement costs time and money, not to mention wear and tear on your body.
Adjusting Pallets
After the machine is in place, work on the pallets. The first thing you need to do is ensure they are stable and level.
Step 2: Make sure pallets won’t move when you push or rotate them. If they move, tighten the clamp or do what needs to be done to ensure they don’t move.
Also, make sure all pallets are level — not only left to right, but also front to back. If you have multiple pallets, then make sure each pallet is level and equidistant from the floor. Everything begins with this, so take the time to get it right. New screen-printing presses have pallets that are close to level when they arrive, but if you’re working with a used press or if your shop floor isn’t level, then this is a crucial step.
Leveling The Screens
Once you are sure that the pallets are perfectly level, it’s time to mount the screens, ensuring they are level to the pallets.
Step 3: Clamp an aluminum screen into the first screen clamp. I prefer aluminum frames instead of wooden ones because they are flat and will resist warping. Most, if not all, manual screen-printing presses have bolts that attach the clamps to the screen carousel. These bolts all
ow for adjustments to the screen clamps to make the screen level. In the same manner that you did with the pallets, ensure the screens are level not only left to right, but also front to back.
Off-Contact
Now is the best time to discuss off-contact, which is the distance from the bottom of the screen to the top of the substrate. There’s a big difference in the distance from the bottom of the screen to a bare pallet; to the top of a T-shirt laying on the pallet; or to the top of a sweat shirt laying on top of the pallet. The variables associated with off-contact are important to remember.
Step 4: Off-contact can simply be adjusted by using a paint stick or another type of spacer that can be placed underneath the screen where it is clamped, so it will raise the screen accordingly. This off-contact allows the screen to peel away from the printed garment after the squeegee stroke.
With a one-color image — let’s say black ink on a white shirt — off-contact isn’t critical. But for any other print, be it multicolor, special effects, etc., off-contact is needed to allow the screen to peel away from the print immediately after the squeegee stroke.
Off-Contact Guidelines
Prepping Pallets
After continuous printing, pallets can get dirty and need to be cleaned. In the old days, we would spend half a day using harsh and toxic solvents like MEK or Xylol to remove the spray adhesive buildup after thousands of prints. With today’s technology, that’s not necessary.
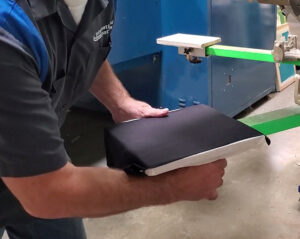
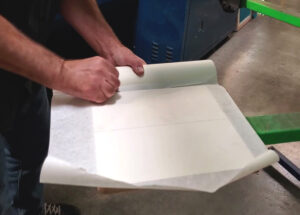
Step 5: Prep the pallets by covering them with what’s called a pallet peel protector (or pallet tape). This paper product has a removable adhesive on it — similar to masking tape, except it’s much wider. It covers the pallet and makes it easier to clean after printing. Now, you can simply cover the pallet with pallet paper, peel it off at the end of a print job, re-cover the pallet with new paper and start another job.
Pallet Adhesive
Many printers use the standard spray adhesive that comes in a can, which is convenient. However, there are newer adhesive products available on the market for you to try.
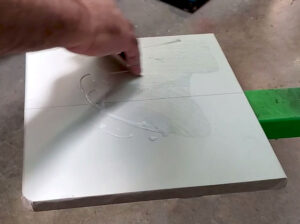
Step 6: Instead of spray adhesive, try using a water-based adhesive. It’s a white glue that can be spread onto the pallet and stays tacky for an extended period of time. It can be wet repeatedly to activate the tackiness for extended use.
Simply apply a bead of the water-based adhesive onto the pallet paper and use a piece of cardboard or another type of scraper to spread the adhesive onto the pallet, concentrating around the image area. Then, let it dry and you’re good to go. Some printers do this step just before they take a break to allow sufficient time for the adhesive to dry. Large print shops often can skip the wait when they’re in full production mode because the pallets may be so hot from all the flashing, the adhesive dries as soon as it’s applied.