Get to Know Your Screen Printing Tools - And How Best To Use Them
May 19, 2021
In this article published in ScreenPrinting Magazine, Kieth Stevens explains how every instrument you use during screen printing can affect the outcome and quality of your final prints.
The right tools let you create better prints at a faster rate, which ultimately improves your bottom line
YOU MUST HAVE the proper tools to do a proper job. Seems simple, but I write about this often because it’s incredibly important for shops to know and remember. Familiarity with the correct tools will allow you to create better prints at a faster rate, which will ultimately improve your bottom line. I visit some very large shops every month, and one thing they have in common is they all must keep their production streamlined. It’s a tough world at the top, and in order to be profitable, you simply can’t be guessing all the time. Yes, there’s some artistry involved in making a print look better, but the simple stuff must remain just that: simple.
At International Coatings, we print many samples in-house to keep a ready supply for display and sales purposes. When a new design comes in, the sales and printing staff review it for the following parameters:
- How detailed is the art (this determines the screen selection)?
- What type of garment is it to be printed on (ink selection)?
- Are any specialty inks to be included (gel gloss, glitter, puff, etc.)?
- If there are specialties, does the emulsion need to be thicker (capillary film)?
- Further considerations depending on the special effect inks to be used:
- Thicker inks typically need a longer dwell time in the dryer; is your dryer long enough?
- Can it be slowed down enough?
- Will it scorch the garment if it is in the dryer longer?
- Can the heat be reduced while still curing the ink completely?
- How many flashes will it take to produce a great image?
If you don’t take everything under consideration (and there’s a lot to consider), you may find yourself with an image that isn’t what you expected. But even if the image isn’t up to snuff, with the proper tools and some experience, you may be able to salvage the project and come out with a great image you can be proud of.
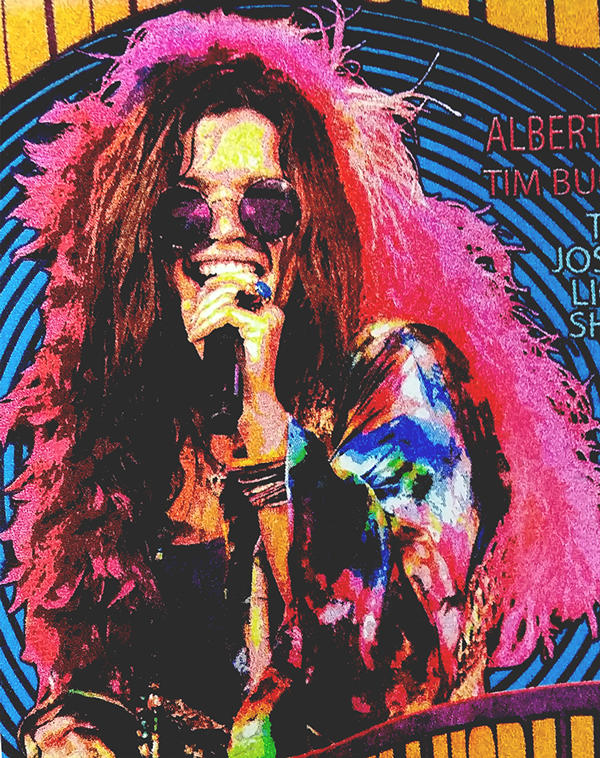
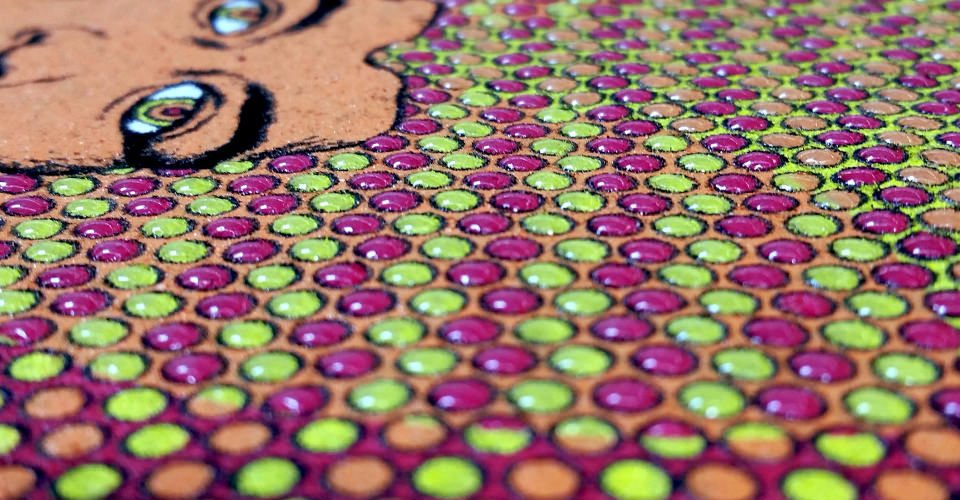
Take a look at Figure 1, a photo of a recent print. You can see what the print initially looked like after selecting the screens, picking Pantone colors, and choosing the squeegee durometer, angle, and pressure. Flood pressure and stroke speed were adjusted, but even after all the educated guesswork, the print still wasn’t quite right. The overall print looked very pixelated and “rough.” Some of the colors were too strong and dominated the print. So, how do you print less ink without changing the separation or the screen mesh, when both options cost additional time and money? Less squeegee angle, less squeegee pressure, a harder durometer, a faster print stroke, less flood pressure, and faster flood speed. All of these tweaks can help in reducing the amount of ink deposited.
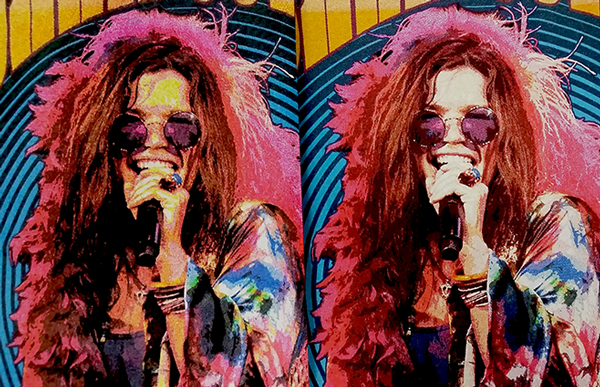
Figure 2 shows the print after we made more adjustments. You can see a marked improvement in the colors and details. We made alterations to the flood and stroke speed as well as squeegee pressure, angle (straightened to allow less ink to pass, but with increased pressure), and print speeds (slightly
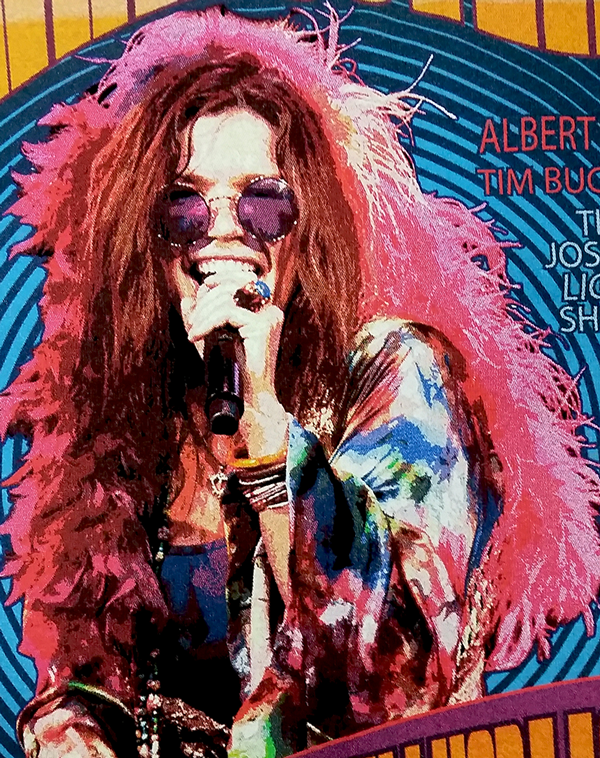
slower). We also adjusted the squeegee durometer on one of the squeegees (orange red ink) to a harder one to allow less ink to penetrate, therefore less of the color to dominate. We then reduced the black ink and the orange red ink with 50 percent clear reducer. This allowed for the burgundy tones in the hair color to show through while also creating a more realistic flesh-tone on the face.
Figure 3 shows the side-by-side comparisons between the two images.
If you want to deposit more ink without double stroking, then basically the opposite is required: a softer squeegee at a greater angle, slower print and flood speed, and more flood pressure. All of these will help in depositing more ink onto the substrate.
Being able to make adjustments on the fly means you need different types of squeegee durometers on hand to be able to switch them out. Be sure to have a few different types of squeegee hardness available. You can even try an old, rounded squeegee to see if that can add more ink when in a bind. Rounded squeegees are great for printing puff inks or other types of inks that do not require much detail.

Other Considerations
What’s getting in the way of most printers nowadays are the complicated, ever-changing garment fabric components and ever-expanding special effects requests pushing the boundaries – adding multiple special effects on the same design, for example. That’s why I consider screen printing an art form – yes, the machine operator is an artist!
But like every artist, each one has their own style. For instance, I may add a softer squeegee first when I want to add more ink deposit, another may simply adjust the angle. Another may want to add more flood pressure to push the ink into the screen prior to the squeegee. Someone may try a little of all of them at once depending on the amount needed. All of these adjustments will add more ink, but I guarantee no two artists are alike. And that’s a cool thing.
More Tips
Another tip to keep in mind during the planning process is if you think more ink will be needed for a certain color, try using a lower mesh count or adding more emulsion to the shirt side of the screen.
Both of these methods can have a dramatic effect on the ink deposit way before ink hits the screen.
Sometimes even the best setup, proper screens, squeegees, and adjustments simply may not get the desired results, and you may have to head to the ink room and do some more artistry. After you’ve done all the adjustments you can at the press, you may find that one or several of the colors may just be too strong. Try adding some clear base to the strong colors and you should be able to reduce the strength so the color blends and works with all the other colors in the design.
Most artists don’t get a do-over of their art after it’s been printed, but when screen printing is in production, you can still tweak the image until it’s just right. Then you can make thousands just like it, which is fun. To this day, I still run across people wearing shirts with images I screen printed back in the early ’80s, and memories come flooding back on some of the tweaks and changes I had to make when printing those jobs.
I can’t stress enough the importance of getting to know your tools. Know how each tool can affect your print, understand what parameters you can tweak to obtain more or less ink deposits, and review what’s in your arsenal. Your production process will be faster, your prints will be better, and your customers will be happier!