 In an article published by Screen Printing Magazine, John Levocz and co-author Kevin Kauth of Chromaline, give us some tips on how to achieve the best white print.
Every screen printer spends a good amount of time trying to find the best white ink on the market, searching for the ever-elusive “one hit white,” saving your shop time and money. While white inks have improved significantly over the years, there’s still no one right answer and definitely not a one-hit white.
While other shops are chasing the white rabbit, they are often ignoring the steps it takes to get the best looking and best feeling white print they can using items that are readily available in their own shops. You will see in this article that the
last thing we go over is the best ink. To get the best print, a lot of other stars have to align first.
Screens
Mesh Counts
While we all know that the mesh count is one of the key factors in determining how much ink is laid down, we often forget that alongside the mesh count is the thread diameter. A 156 mesh thin thread is going to have a lot more open area than a 156 mesh standard or thick thread. All three 156 meshes will give you a differing amount of matdown and opacity while still allowing you to hold the same edge definition.
Generally speaking, there is no need to use low mesh screens to achieve a good white. Your mesh count should be determined by your garment, garment color, ink color, and artwork. On lighter shirts, print with a higher mesh count for a better feel. On darker shirts, you’ll probably still need a lower mesh count – but you can probably under base with a 156 mesh and then print your highlight white with a 230 mesh to achieve a bright but soft print.
EOM/Stencil Thickness
Many screen printers believe that a thicker Emulsion Over Mesh (EOM) will allow for a thicker and more opaque print. That isn’t necessarily true – too thick or thin of a stencil can create printability issues of their own. If your emulsion is too thin, you will end up with mesh interference and poor edge definition; if your emulsion is too thick, your screen might not clear leaving you with an uneven or blotchy print.
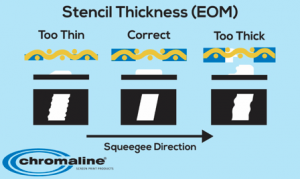
What you are looking for is an EOM of 10-20% of the mesh thickness. If you’re using a pure photopolymer emulsion like ChromaBlue or ChromaLime, a good rule of thumb is to coat 1/1 with the round edge of the coater on meshes 180 and lower, and use the sharp edge on mesh counts higher than 180. Be sure to coat the substrate/shirt side first, and then the squeegee side, and allow the screen to dry substrate side down (squeegee side up) – allowing the emulsion to pull through and create more of a gasket on the shirt side.
Mesh Tension & Off Contact
Another common mistake many screen printers make is keeping screens in their rotation far past their utility. If your mesh has lost its tension, the screen won’t pop back up right behind the squeegee and can lead to a rough print. You might try to compensate for that by raising your off-contact, which will lead to a harder time registering your prints.
A properly tensioned screen will allow you to print with lower off contact and still achieve a good shearing after printing. It will also allow you to print with less squeegee pressure, ensuring that your ink will sit on top of the garment, not making you have to push down too hard and drive the ink
into the shirt. Finally, the lower off contact will make sure your screen doesn’t stretch out, which can cause registration issues.
Squeegee Pressure
When you have properly tensioned and coated screens, and your off contact is just right, you only have to worry about laying ink down onto the garment. When printing plastisol inks, all you are aiming to do is to have the ink sit on top of the garment – not driving it in. Printing the right white ink with medium pressure using a 70 durometer squeegee, you should get a good print.
The Best Ink
We are now at the final step for achieving a good white – the actual white ink. There are a couple factors to consider – what is your budget and what are you printing on?
All Whites Are Not Created Equal
As with anything in life, economy/inexpensive inks can cause more headaches than they’re worth. Generally speaking, cheaper inks use a lot of fillers or contain more base than pigment, creating an ink that isn’t going to give you the opacity, printability, or soft feel that you’re aiming for.
Use the Right Ink For Your Garment
Every white ink is designed to work on specific types of garments. Polyester inks are primarily designed to block dye migration, so they often have a thicker feel than other inks, either through dye-blocking chemicals, lower curing ability, or blowing agents in the ink. Cotton inks, on the other hand, don’t have any dye blocking agents, and won’t work on 100% poly garments. Make sure the ink you are using is the right ink for the garment you are printing on. If you are looking for a more all-around ink, Low Bleed inks are a great option that work on cotton, 50-50 garments, and many tri-blends.
You might even want to have a variety of white inks based on what you need. Cotton whites are very soft, have good fiber matdown, and are inexpensive compared to many low bleed or polyester inks.
While your results may differ slightly, the parameters laid out above are a great starting point. With tight screens, coated properly, using the right mesh count and a quality ink, you can achieve great prints.
International Coatings manufactures a complete line of Centris™ non-Phthalate screen printing inks, including a wide variety of
whites,
specialty inks, special effects inks,
color matching systems,
additives and
reducers. In addition, International Coatings also manufactures a line of
AXEON™ non-PVC printing inks and
special effects inks. For more information on our products, please visit our website at
www.iccink.com.